Your water heater is what’s responsible for making sure you always have hot water available, whether it’s for showers, laundry, or cleaning dishes. A leaky water heater can not only disrupt your regular routines but may also lead to costly repairs and risks of water damage. In this post, we will break down the different types of water heater leaks, how they can be fixed, and when it might be time to call a professional for help.
Most Common Causes of Water Heater Leaks
Water heater leaks can manifest in various forms, each with its own underlying cause. Understanding the different types of leaks can help you diagnose and fix the problem.
- Tank Leaks: These are the most common type of leaks in tank water heaters, occurring when the inner tank sustains damage. Over time, the constant heating and cooling of water can lead to the tank’s wear and tear, causing it to leak.
- Drain Valve Leaks: The drain valve can start to leak if it becomes loose or damaged. This valve is used to empty the tank for maintenance or replacement, and if not properly sealed, it can lead to a slow but steady leak.
- Pressure Relief Valve Leaks: This valve is designed to relieve pressure from the tank if it gets too high. If the valve is faulty or the pressure within the tank is consistently too high, it can lead to a leak.
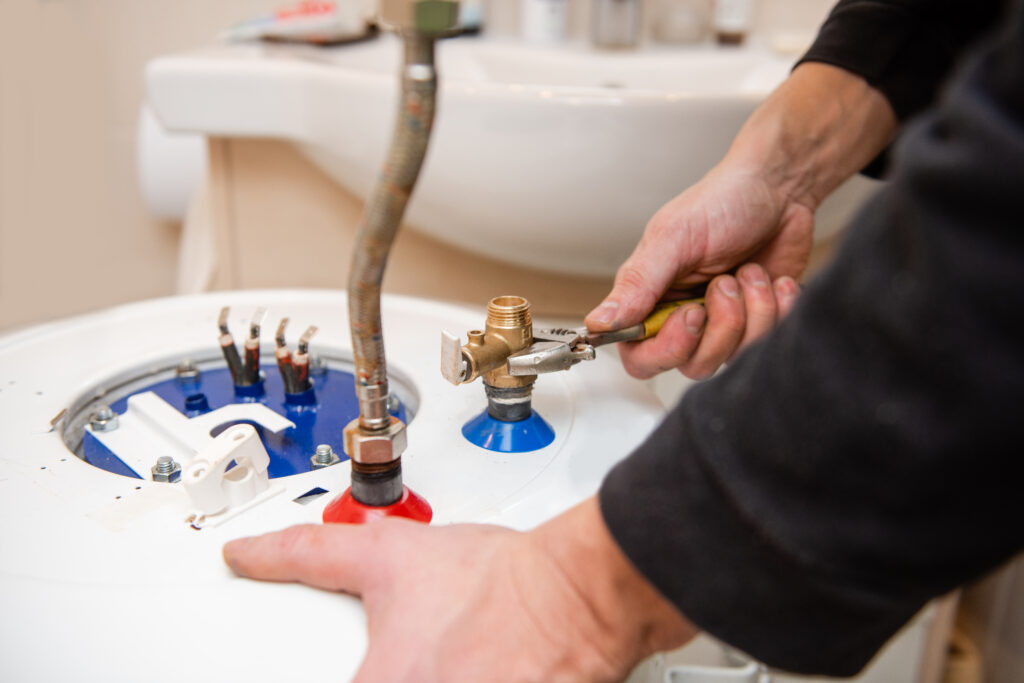
- Inlet and Outlet Connections: The points where the cold water inlet pipe and the hot water outlet pipe connect to your water heater can also be sources of leaks. If these connections are loose, improperly installed, or corroded, water may leak from these points.
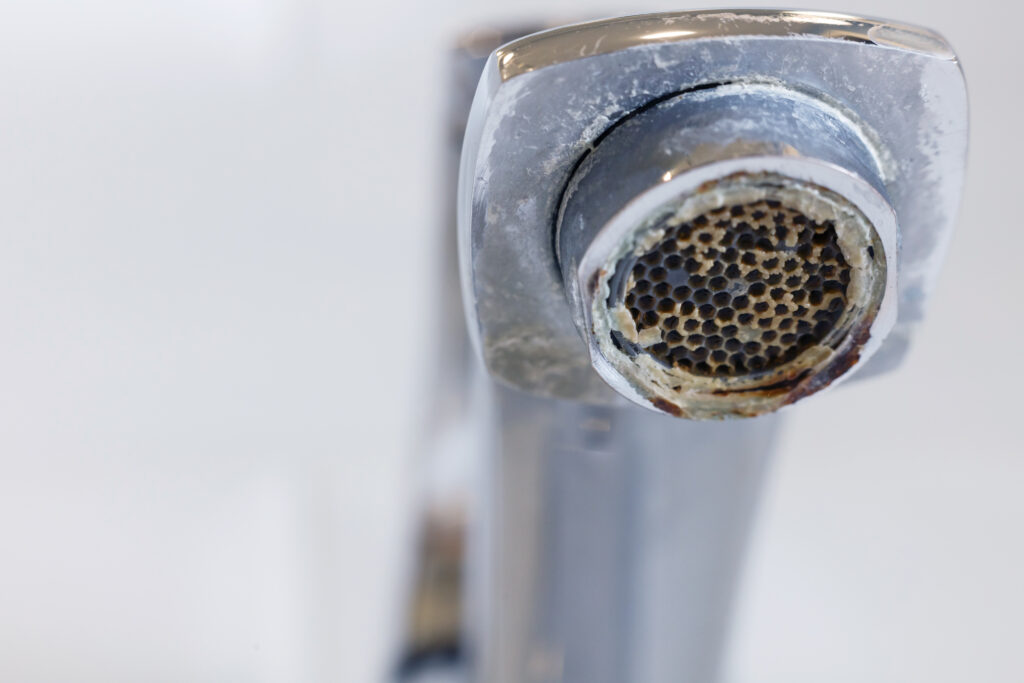
- Condensation or ‘Sweating’: Sometimes, what appears to be a leak is actually condensation forming on the outside of the water heater. This can happen when cold water fills the tank in a humid environment, giving the illusion of a leak. This type of “leak” is harmless and can be resolved by wiping down the tank regularly.
From tank leaks to a simple case of condensation, understanding the differences can prevent unnecessary expenses and ensure a timely fix. A leak left unchecked for too long can cause water damage, mold growth, and even structural damage to your home. Addressing any leaks as soon as possible is important to avoid these issues.
Identifying the Source Of the Leak
To identify the source of your water heater leak, follow these steps:
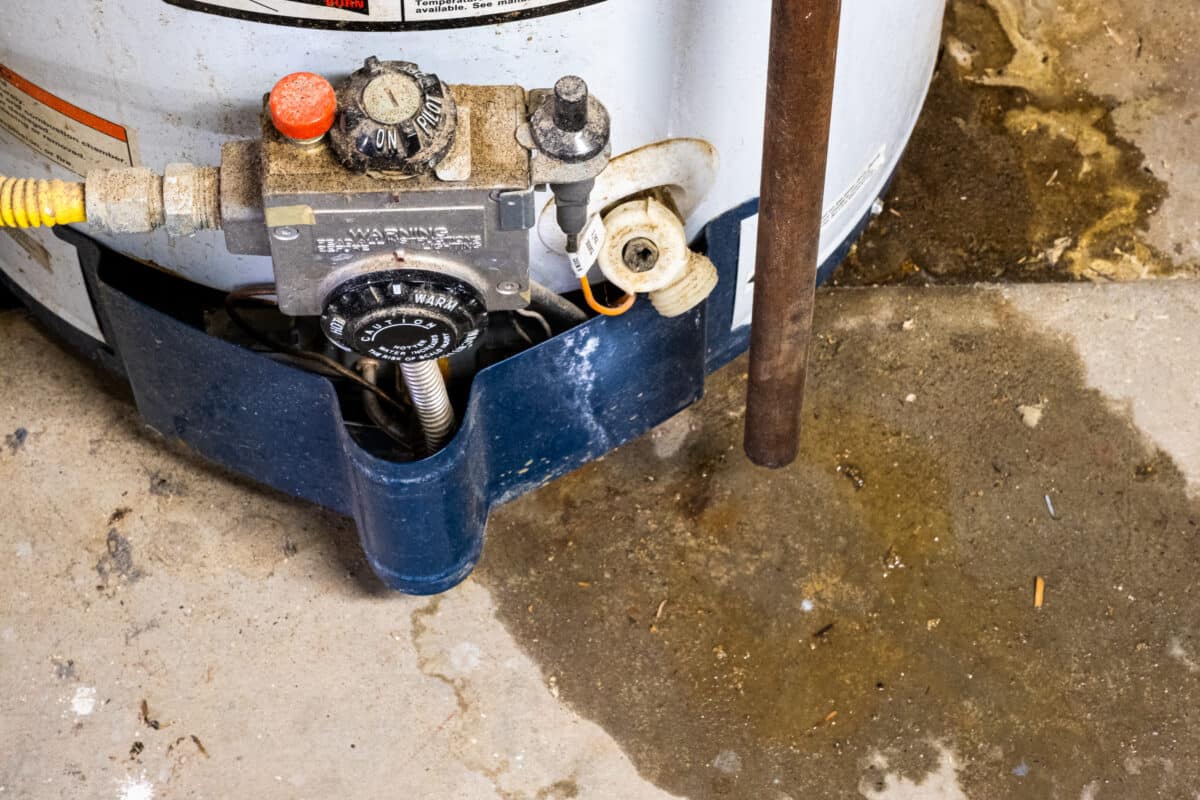
- Inspect the Tank: Take a closer look at the tank itself and carefully inspect it for any signs of damage or rust. Keep an eye out for any visible cracks, dents, or areas where the paint may be peeling off. These can be common areas where leaks tend to occur.
- Examine the Drain Valve: Check the drain valve at the bottom of the water heater and ensure it is tightly closed. If the valve is loose or not fully closed, this could be the source of a leak.
- Test the Pressure Relief Valve: Carefully lift the lever on the pressure relief valve and let it snap back into place. Observe the behavior of the valve after releasing it. If you notice that water continues to flow from the valve even after releasing it, this may indicate a faulty valve that can cause leaks.
- Look at the Inlet and Outlet Connections: Take a close look at the connections where the water enters and exits the water heater. Corrosion or loose fittings can create gaps or openings where water can escape, leading to leaks.
Remember, if you can’t find the source of the leak or if the leak continues even after your attempts to fix it, it’s important to call a professional plumber to avoid further damage or potential safety risks. They will have the proper knowledge and tools to diagnose and fix the issue.
DIY fixes for Minor Leaks
If you can locate the source of your water heater leak, there are a few simple fixes you can try to address minor leaks. These DIY approaches can save you both time and money.
- Tighten Loose Connections: One of the most straightforward fixes for minor leaks involves tightening loose connections. This includes the inlet and outlet connections, as well as the drain valve. Always use the proper tools and be careful not to overtighten and potentially damage the fittings.
- Replacing the Pressure Relief Valve: If testing reveals that your pressure relief valve is faulty, you can replace it by following the manufacturer’s instructions. Be sure to shut off the power and water supply to the heater before attempting this fix.
- Use Plumber’s Tape: Plumber’s tape can be applied to the threads of your pipe connections to help seal them and prevent minor leaks. It’s an inexpensive solution and can be found at most hardware stores.
- Replace Worn Out Anode Rod: The anode rod is an important component of your water heater that helps prevent corrosion. If your anode rod is worn out, it can lead to a minor leak. You can replace it yourself, but be sure to follow the manufacturer’s guidelines.
If you’re unsure about your DIY skills or suspect a more significant issue, it’s always best to call a professional plumber. They have the expertise and tools to fix leaks and ensure your water heater is functioning correctly.
Preventative Measures to Avoid Future Leaks
Preventing a problem is often easier than fixing one. The same holds true for water heater leaks. By taking preventative measures, you can prolong the life of your water heater and avoid the inconvenience of leaks.
- Regular Inspections: Regularly inspecting your water heater can help identify potential issues before they become serious. Pay attention to signs of corrosion, leaks, or unusual noises.
- Annual Flush: Flushing your water heater at least once a year can help remove sediment build-up that can cause the tank to leak or reduce efficiency.
- Pressure Relief Valve Test: Testing the pressure relief valve annually ensures it’s working correctly and can help prevent leaks.
- Maintain Correct Pressure: Maintaining the correct pressure in your water tank is vital. Over-pressurization can lead to leaks and other damage. You can monitor the pressure with a water pressure gauge.
- Temperature Setting: Keeping your water heater at the manufacturer’s recommended temperature can prevent overheating and subsequent leaking.
- Anode Rod Replacement: Depending on your water hardness, the anode rod should be replaced every three to five years. This can prevent tank corrosion and subsequent leaks.
- Professional Servicing: Consider having your water heater professionally serviced every few years, as they can spot potential issues that may not be immediately obvious.
Taking these preventative measures can prolong the life of your water heater and save you money on repairs or replacements.
In addition to regular maintenance, it’s essential to be aware of signs that your water heater may need to be replaced. These include a decrease in hot water supply, rusty or discolored water, strange noises coming from the tank, and increased energy bills. If you notice any of these warning signs, it may be time to invest in a new water heater.
Let Nearby Plumbing Fix Your Water Heater Leaks
Understanding the reasons behind water heater leaks and knowing how to address them is an essential part of home maintenance. Don’t wait for a leak to happen. Take the first step towards safeguarding your home against water heater issues. If you’re unsure about the state of your water heater or need professional advice, we’re here to help. Contact us today for help fixing an existing leak or for more information about how to prevent leaks in the first place.